《Java编程思想》笔记18-Java I/O系统
File 类
File 类是文件和目录路径名的抽象表示形式。File 类的实例是不可变的;也就是说,一旦创建,File 对象表示的抽象路径名将永不改变。
list()
String[] list() 返回一个字符串数组,这些字符串指定此抽象路径名表示的目录中的文件和目录。
String[] list(FilenameFilter filter) 返回一个字符串数组,这些字符串指定此抽象路径名表示的目录中满足指定过滤器的文件和目录。
public interface FilenameFilter { // FilenameFilter 接口
    boolean accept(File dir, String name);
}

public class DirList3 {
    public static void main(final String[] args) {
        File path = new File(".");
        String[] list;
        if (args.length == 0) {
            list = path.list();
        } else {
            list = path.list(new FilenameFilter() { // 匿名内部类实现 FilenameFilter 接口
                private Pattern pattern = Pattern.compile(args[0]);

                public boolean accept(File dir, String name) {
                    return pattern.matcher(name).matches();
                }
            });
        }
        Arrays.sort(list, String.CASE_INSENSITIVE_ORDER); // 字母顺序排序
        for (String dirItem : list) {
            System.out.println(dirItem);
        }
    }
}
输出和输入
我们很少用单个类创建自己的系统对象。一般情况下,我们都是将多个对象重叠在一起,提供期望的功能(这是装饰器设计模式)。
InputStream 类型
InputStream 的作用是标志那些从不同起源地产生输入的类。这些起源地包括(每个都有一个相关的InputStream 子类):
- 字节数组
- String 对象
- 文件
- “管道”,它的工作原理与现实生活中的管道类似:将一些东西置入一端,它们在另一端出来。
- 一系列其他流,以便我们将其统一收集到单独一个流内。
- 其他起源地,如 Internet 连接等
| 类 | 功能 | 构建器参数/如何使用 |
|---|---|---|
| ByteArrayInputStream | 允许内存中的一个缓冲区作为 InputStream 使用 | 从中提取字节的缓冲区/作为一个数据源使用。通过将其同一个 FilterInputStream 对象连接,可提供一个有用的接口 |
| FileInputStream | 用于从文件读取信息 | 代表文件名的一个 String,或者一个 File 或 FileDescriptor 对象 /作为一个数据源使用。通过将其同一个 FilterInputStream 对象连接,可提供一个有用的接口 |
| PipedInputStream | 产生为相关的 PipedOutputStream 写的数据。实现了“管道化”的概念 | PipedOutputStream/作为一个数据源使用。通过将其同一个 FilterInputStream 对象连接,可提供一个有用的接口 |
| SequenceInputStream | 将两个或更多的 InputStream 对象转换成单个 InputStream 使用 | 两个 InputStream 对象或者一个 Enumeration,用于 InputStream 对象的一个容器/作为一个数据源使用。通过将其同一个 FilterInputStream 对象连接,可提供一个有用的接口 |
| FilterInputStream | 抽象类,作为装饰器的接口,装饰器为其他 InputStream 类提供了有用的功能。 |
OutputStream 类型
| 类 | 功能 | 构建器参数/如何使用 |
|---|---|---|
| ByteArrayOutputStream | 在内存中创建一个缓冲区。我们发送给流的所有数据都会置入这个缓冲区。 | 可选缓冲区的初始大小/用于指出数据的目的地。若将其同 FilterOutputStream 对象连接到一起,可提供一个有用的接口 |
| FileOutputStream | 将信息发给一个文件 | 用一个 String 代表文件名,或选用一个 File 或 FileDescriptor 对象/用于指出数据的目的地。若将其同 FilterOutputStream 对象连接到一起,可提供一个有用的接口 |
| PipedOutputStream | 我们写给它的任何信息都会自动成为相关的 PipedInputStream 的输出。 | 实现了“管道化”的概念 PipedInputStream/为多线程处理指出自己数据的目的地/将其同 FilterOutputStream 对象连接到一起,便可提供一个有用的接口 |
| FilterOutputStream | 抽象类,作为装饰器的接口;装饰器为其他 OutputStream 类提供了有用的功能。 |
添加属性和有用的接口
装饰器必须拥有与它装饰的那个对象相同的接口,但装饰器亦可对接口作出扩展,这种情况见诸于几个特殊的“过滤器”类中
装饰器为我们提供了大得多的灵活性(因为可以方便地混合与匹配属性),但它们也使自己的代码变得更加复杂。原因在于 Java IO 库操作不便,我们必须创建许多类——“核心”IO 类型加上所有装饰器——才能得到自己希望的单个 IO 对象。
通过 FilterInputStream 从 InputStream 里读入数据
基本都是使用基本的 InputStream 类型作为构造器参数创建这些类对象。
| 类 | 功能 | 构建器参数/如何使用 |
|---|---|---|
| DataInputStream | 与 DataOutputStream 联合使用,使自己能以机动方式读取一个流中的基本数据类型(int,char ,long 等等) | InputStream/ 包含了一个完整的接口,以便读取基本数据类型 |
| BufferedInputStream | 避免每次想要更多数据时都进行物理性的读取,告诉它“请先在缓冲区里找” | InputStream,可以指定缓冲区大小/本质上不提供接口,只不过是向进程中添加缓冲区所必需的。与接口对象搭配 |
通过 FilterOutputStream 向 OutputStream 里写入数据
| 类 | 功能 | 构建器参数/如何使用 |
|---|---|---|
| DataOutputStream | 与 DataInputStream 配合使用,可以按照可移植的方式向流中写入基本数据类型 | 包含用于写入基本类型数据的全部接口 |
| PrintStream | 用于产生格式化输出。DataOutputStream 处理是数据的存储,而 PrintStream 处理显示 | 可以用 Boolean 值指示是否在每次换行时清空缓冲区(可选)应该是对 OutputStream 对象的 final 封装。 |
| BufferedOutputStream | 使用它以避免每次发出数据的时候都要进行实际的写入。可调用 flush(),对缓冲区进行刷新清空 | 可选缓冲区大小,本身并不能提供一个接口,只不过是向进程中添加缓冲区所必需的。与接口对象搭配 |
Reader 和 Writer
InputStreamReader 将一个 InputStream 转换成 Reader,OutputStreamWriter 将一个 OutputStream 转换成 Writer。
更改数据流的行为
尽管 BufferedOutputStream 是 FilterOutputStream 的一个子类,但是 BufferedWriter 并不是 FilterWriter 的子类(尽管FilterWriter是一个抽象类,但没有任何子类,把它放在那里也只是把它作为一个占位符))。然而,两个类的接口是非常相似的
| 过滤器:Java 1.0 类 | 对应的 Java 1.1 类 |
|---|---|
| FilterInputStream | FilterReader |
| FilterOutputStream | FilterWriter (没有子类的抽象类) |
| BufferedInputStream | BufferedReader(也有 readLine()) |
| BufferedOutputStream | BufferedWriter |
| DataInputStream | 使用 DataInputStream(除非要使用 readLine(),这时需要使用一个 BufferedReader) |
| PrintStream | PrintWriter |
| LineNumberInputStream | LineNumberReader |
| StreamTokenizer | StreamTokenizer (使用接收Reader的构造器) |
| PushBackInputStream | PushBackReader |
RandomAccessFile
RandomAccessFile 不在 io 继承体系内,直接继承的 Object。
RandomAccessFile 适用于由大小已知的记录组成的文件,所以我们能用 seek()从一条记录移至另一条,然后读取或修改那些记录。
RandomAccessFile 类似 DataInputStream 和 DataOutputStream 的联合使用。其中,getFilePointer()用于查找当前在文件的什么地方,seek()用于移至文件内的一个新地点,length() 用于判断文件的最大长度。此外,构建器要求使用另一个变量(与 C 的 fopen()完全一样),指出是读(”r”),还是读写(”rw” )。
只有 RandomAccessFile 支持搜寻方法,并且只适用于文件。BufferedInputStream 可以允许我们标记一个位置(使用 mark(),它的值容纳于单个内部变量中),并用 reset()重设那个位置。
在 JDK1.4 中,RandomAccessFile 的大多数功能由 nio 存储映射文件所替代。
I/O 流的经典适用方式
缓冲输入文件
public static String read(String filename) throws IOException {
    // Reading input by lines:
    BufferedReader in = new BufferedReader(new FileReader(filename));
    String s;
    StringBuilder sb = new StringBuilder();
    while ((s = in.readLine()) != null)
        sb.append(s + "\n");
    in.close();
    return sb.toString();
}
从内存输入
StringReader in = new StringReader(BufferedInputFile.read("MemoryInput.java"));
int c;
while ((c = in.read()) != -1) {
    System.out.print((char) c); // read() 是以 int 形式返回下一字节
}
格式化的内存输入
DataInputStream in = new DataInputStream(new ByteArrayInputStream(
        BufferedInputFile.read("FormattedMemoryInput.java").getBytes()));
while (in.available() != 0) { // 查看还有多少可供存取的字符
    System.out.print((char) in.readByte());
}
基本的文件输出
BufferedReader in = new BufferedReader(new StringReader(
        BufferedInputFile.read("BasicFileOutput.java")));
PrintWriter out = new PrintWriter(new BufferedWriter(new FileWriter("BasicFileOutput.out")));
//PrintWriter out = new PrintWriter("file.out");  //Java SE5提供了更加快捷的构造器,仍然使用缓存,只是不用自己实现
int lineCount = 1;
String s;
while ((s = in.readLine()) != null)
    out.println(lineCount++ + ": " + s); // 自己记录行号
out.close();
in.close();

BufferedReader in = new BufferedReader(new FileReader("BasicFileOutput.out"));
String s;
StringBuilder sb = new StringBuilder();
while ((s = in.readLine()) != null)
    sb.append(s + "\n");
in.close();
System.out.println(sb.toString());
存储和恢复数据
为了输出可供另一个流恢复的数据,我们需要用 DataInputStream 写入数据,并用 DataInputStream 恢复数据。
DataOutputStream out = new DataOutputStream(new BufferedOutputStream(
        new FileOutputStream("Data.txt")));
out.writeDouble(3.14159);
out.writeUTF("That was pi");
out.writeDouble(1.41413);
out.writeUTF("Square root of 2");
out.close();
DataInputStream in = new DataInputStream(new BufferedInputStream(
        new FileInputStream("Data.txt")));
System.out.println(in.readDouble()); // 需要按顺序调用,且不能多次调用
System.out.println(in.readUTF());
System.out.println(in.readDouble());
System.out.println(in.readUTF());

/* Output:
3.14159
That was pi
1.41413
Square root of 2
*///:~
读写随机访问文件 RandomAccessFile
使用 RandomAccessFile,必须知道文件的排版,才能正确的操作它,类似于 DataInputStream 和 DataInputStream(实现了相同的接口:DataInput 和 DataOutput)。
public class UsingRandomAccessFile {
    static String file = "rtest.dat";

    static void display() throws IOException {
        RandomAccessFile rf = new RandomAccessFile(file, "r");
        for (int i = 0; i < 3; i++)
            System.out.println("Value " + i + ": " + rf.readDouble());
        System.out.println(rf.readUTF());
        rf.close();
    }

    public static void main(String[] args) throws IOException {
        RandomAccessFile rf = new RandomAccessFile(file, "rw");
        for (int i = 0; i < 3; i++)
            rf.writeDouble(i * 1.414);
        rf.writeUTF("The end of the file");
        rf.close();
        display();
        rf = new RandomAccessFile(file, "rw");
        rf.seek(2 * 8); // 因为 Double 是 8 字节长,查找第二个,可以使用 2*8 来产生查找位置
        rf.writeDouble(47.0001);
        rf.close();
        display();
    }
} /* Output:
Value 0: 0.0
Value 1: 1.414
Value 2: 2.828
The end of the file
Value 0: 0.0
Value 1: 1.414
Value 2: 47.0001
The end of the file
*///:~
管道流
管道输入流应该连接到管道输出流;管道输入流提供要写入管道输出流的所有数据字节。通常,数据由某个线程从 PipedInputStream 对象读取,并由其他线程将其写入到相应的 PipedOutputStream。不建议对这两个对象尝试使用单个线程,因为这样可能死锁线程。结合多线程技术使用。还有 PipedReader 及 PipedWriter。
public class PipedStream {
    public static void main(String[] args) throws IOException {
        PipedInputStream input = new PipedInputStream();
        PipedOutputStream output = new PipedOutputStream();

        input.connect(output); // 管道输入输出流连接
        new Thread(new Input(input)).start();
        new Thread(new Output(output)).start();
    }
}
class Input implements Runnable{
    private PipedInputStream in;
    Input(PipedInputStream in){
        this.in = in;
    }
    public void run(){
        try {
            byte[] buf = new byte[1024];
            int len = in.read(buf);

            String s = new String(buf,0,len);
            System.out.println("s="+s);
            in.close();
        } catch (Exception e) {
        }
    }
}
class Output implements Runnable{
    private PipedOutputStream out;
    Output(PipedOutputStream out){
        this.out = out;
    }
    public void run(){
        try {
            Thread.sleep(5000);
            out.write("hi,管道来了!".getBytes());
        } catch (Exception e) {
        }
    }
}
标准 I/O
System.in,System.out 以及 System.err。System.out 已预封装成一个 PrintStream 对象。System.err 同样是一个 PrintStream,但 System.in 是一个原始的 InputStream。
从标准输入中读取
BufferedReader stdin = new BufferedReader(new InputStreamReader(System.in));
String s;
while ((s = stdin.readLine()) != null && s.length() != 0) {
    System.out.println(s);
}

Scanner scanner = new Scanner(System.in);
while ((s = scanner.nextLine()) != null && s.length() != 0) {
    System.out.println(s);
}
将 System.out 转换成 PrintWriter
PrintWriter out = new PrintWriter(System.out, true);
out.println("Hello, world");
第二个参数设为 true,以便开启自动刷新缓存区的功能,否则,你可能看不到输出。
标准 I/O 重定向
System 类提供了 setIn(InputStream),setOut(PrintStream),setErr(PrintStream)三个静态方法重定向标准 I/O。
I/O 重定向操纵的是字节流,而不是字符流。
PrintStream console = System.out;
BufferedInputStream in = new BufferedInputStream(new FileInputStream("Redirecting.java"));
PrintStream out = new PrintStream(new BufferedOutputStream(
        new FileOutputStream("test.out")));
System.setIn(in);
System.setOut(out);
System.setErr(out);
BufferedReader br = new BufferedReader(new InputStreamReader(System.in));
String s;
while ((s = br.readLine()) != null) {
    System.out.println(s); // 控制台不会打印,会写入 test.out 文件中
}
out.close();
System.setOut(console); // 恢复标准输出流到控制台
进程控制
运行外部程序,并将产生的输出发送到控制台。
String command = "ls";
Process process = new ProcessBuilder(command.split(" ")).start();
BufferedReader results = new BufferedReader(new InputStreamReader(process.getInputStream()));
String s;
while((s = results.readLine())!= null)
    System.out.println(s);
BufferedReader errors = new BufferedReader(new InputStreamReader(process.getErrorStream()));
while((s = errors.readLine())!= null) {
    System.err.println(s);
}
新 I/O
JDK 1.4 的 java.nio.* 包中引入了新的 Java I/O 类库,其目的在于提高速度。实际上,旧的 I/O 包已经使用 nio 重新实现过,以便充分利用这种速度提高。
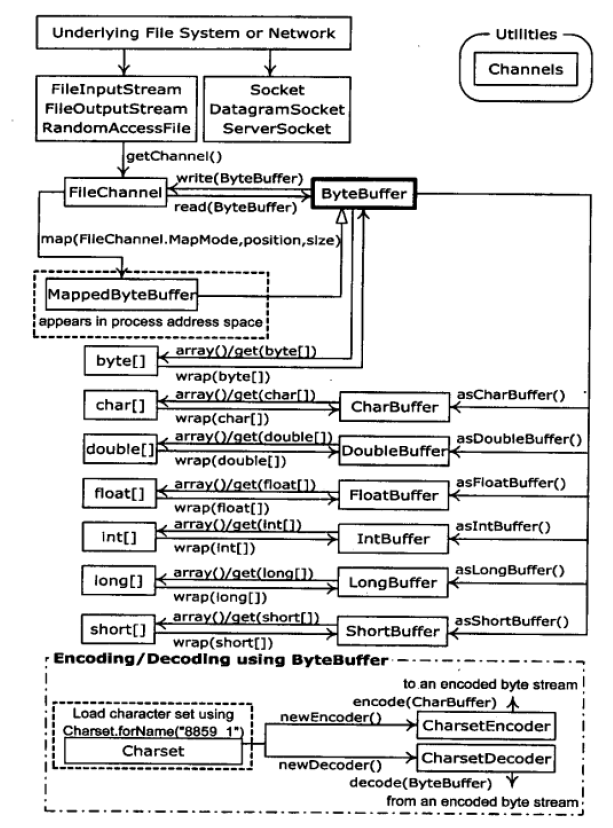
速度的提高来自于所使用的结构更接近于操作系统执行 I/O 的方式:通道和缓冲器。就像是 “煤矿隧道” 和 “拉煤车” 的关系。我们没有直接和通道交互,只是和缓冲器交互,并把缓冲器派送到通道。通道要么从缓冲器获得数据,要么向缓冲器发送数据。
唯一直接与通道交互的缓冲器是 ByteBuffer,可以存储未加工字节的缓冲器。通过告知分配多少存储空间来创建一个 ByteBuffer 对象,并且还有一个方法选择集,用于以原始的字节形式或基本数据类型输出和读取数据。但是,没办法输出或读取对象,即使是字符串对象也不行。这是大多数操作系统中更有效的映射方式。
旧 I/O 类库中有三个类(FileInputStream、FileOutputStream、RandomAccessFile)被修改了,用以产生 FileChannel。注意这些都是字节操纵流,与底层的 nio 性质一致。Reader 和 Writer 这种字符模式类不能用于产生通道;但是 java.nio.channels.Channels 类提供了实用方法,用以在通道中产生 Reader 和 Writer。
public class GetChannel {
    private static final int BSIZE = 1024;

    @SuppressWarnings("resource")
    public static void main(String[] args) throws Exception {
        // Write a file:
        FileChannel fc = new FileOutputStream("data.txt").getChannel();
        fc.write(ByteBuffer.wrap("Some text ".getBytes())); // 将已存在的字节数组“包装”到 ByteBuffer
        fc.close();
        // 添加到文件的末尾
        fc = new RandomAccessFile("data.txt", "rw").getChannel();
        fc.position(fc.size()); // 移动到最后
        // position() 返回此缓冲区的位置。
        fc.write(ByteBuffer.wrap("Some more".getBytes()));
        fc.close();
        // Read the file:
        fc = new FileInputStream("data.txt").getChannel();
        ByteBuffer buff = ByteBuffer.allocate(BSIZE);
        fc.read(buff);
        buff.flip();
        while (buff.hasRemaining()) // 告知在当前位置和限制之间是否有元素。
            System.out.print((char) buff.get());
    }
} /* Output:
Some text Some more
 */// :~
getChannel() 将会产生一个 FileChannel。通道是一种相当基础的东西:可以向它传送用于读写的 ByteBuffer,并且可以锁定文件的某些区域用于独占式访问。
将字节存放在 ByteBuffer 的方法之一是:使用一种 “put” 方法直接对它们进行填充,填入一个或多个字节,或基本数据类型的值。也可以使用 wrap() 方法将已存在的字节数组“包装”到 ByteBuffer 中。一旦如此,就不再复制底层的数组,而是把它作为所产生的 ByteBuffer 的存储器,称之为数组支持的 ByteBuffer。
对于只读操作,必须显式的使用静态的 allocate() 方法来分配 ByteBuffer,分配的大小单位是字节。nio 的目标就是快速移动大量数据,因此 ByteBuffer 的大小就显得尤为重要————实际上,这里使用的 1K 可能比通常使用的小一点(必须通过实际运行应用程序来找到最佳尺寸)。
甚至达到更高的速度也有可能,方法就是使用 allocateDirect() 而不是allocate(),以产生一个与操作系统有更高耦合性的“直接”缓冲器。但是,这种分配的开支会更大,并且具体实现也随操作系统的不同而不同,因此必须再次实际运行应用程序来查看直接缓冲是否可以使程序获得速度上的优势。
一旦调用 read() 来告知 FileChannel 向 ByteBuffer 存储字节,就必须调用缓冲器上的 flip(),让它做好让别人读取字节的准备。(适用于获取最大速度)如果打算使用缓冲器执行进一步的 read() 操作,也必须得调用 clear() 来为每个 read() 做好准备。
// 文件复制程序
public class ChannelCopy {
    private static final int BSIZE = 1024;

    @SuppressWarnings("resource")
    public static void main(String[] args) throws Exception {
        if (args.length != 2) {
            System.out.println("arguments: sourcefile destfile");
            System.exit(1);
        }
        FileChannel in = new FileInputStream(args[0]).getChannel(),
                out = new FileOutputStream(args[1]).getChannel();
        ByteBuffer buffer = ByteBuffer.allocate(BSIZE);
        while (in.read(buffer) != -1) {
            buffer.flip(); // Prepare for writing
            out.write(buffer);
            buffer.clear(); // Prepare for reading
        }
    }
}
当 FileChannel.read() 返回 -1 时(一个分界符,源于Unix和C),表示已经到达了输入的末尾。每次 read() 操作之后,就会将数据输入到缓冲器中,flip() 则是准备缓冲器以便它的信息可以由 write() 提取。write() 操作之后,信息仍在缓冲器中,接着 clear() 操作则对所有的内部指针重新安排,以便缓冲器在另一个 read() 操作期间能够做好接收数据的准备。
特殊方法 transferTo() 和 transferFrom() 允许将一个通道和另一个通道直接相连。
FileChannel in = new FileInputStream(args[0]).getChannel(),
        out = new FileOutputStream(args[1]).getChannel();
in.transferTo(0, in.size(), out);
//Or:
//out.transferFrom(in, 0, in.size());
转换数据
java.nio.CharBuffer 的 toString() 方法返回一个包含缓冲器中所有字符的字符串。Bytebuffer 可以看做是具有 asCharBuffer() 方法的 CharBuffer。
public class BufferToText {
    private static final int BSIZE = 1024;

    @SuppressWarnings("resource")
    public static void main(String[] args) throws Exception {
        FileChannel fc = new FileOutputStream("data2.txt").getChannel();
        fc.write(ByteBuffer.wrap("Some text".getBytes()));
        fc.close();

        fc = new FileInputStream("data2.txt").getChannel();
        ByteBuffer buff = ByteBuffer.allocate(BSIZE);
        fc.read(buff);
        buff.flip();
        System.out.println(buff.asCharBuffer()); // 乱码

        // 使用默认字符集解码:
        buff.rewind(); // 返回到数据开始部分
        String encoding = System.getProperty("file.encoding"); // 获得默认字符
        System.out.println("Decoded using " + encoding + ": "
                + Charset.forName(encoding).decode(buff));

        // 或者,我们可以用东西将打印编码:
        fc = new FileOutputStream("data2.txt").getChannel();
        fc.write(ByteBuffer.wrap("Some text".getBytes("UTF-8")));
        fc.close();

        // 现在再次尝试 读:
        fc = new FileInputStream("data2.txt").getChannel();
        buff.clear();
        fc.read(buff);
        buff.flip();
        System.out.println(buff.asCharBuffer());

        // 使用 CharBuffer 写:
        fc = new FileOutputStream("data2.txt").getChannel();
        buff = ByteBuffer.allocate(24); // 比需要的更多,可以在控制台中看到有空白符存在,但是复制不出来
        buff.asCharBuffer().put("Some text");
        fc.write(buff);
        fc.close();

        // Read and display:
        fc = new FileInputStream("data2.txt").getChannel();
        buff.clear();
        fc.read(buff);
        buff.flip();
        System.out.println(buff.asCharBuffer());
    }
} /* Output:
????
Decoded using UTF-8: Some text
Some text
Some text
*///:~
buff.rewind() 返回到数据开始部分,如果数据超出缓冲区大小,可以调用该方法或 clear()。
ByteBuffer.allocate(1024),limit() 可以查看缓冲区大小,缓冲器(ByteBuffer)会自动把自己的内容置为零。
缓冲器容纳的是普通的字节,为了把它们转换成字符,要么在输入它们的时候对其进行编码(这样,它们输出时才具有意义,否则会有乱码),要么在将其从缓冲器输出时对它们进行解码。java.nio.charset.Charset 类提供了把数据编码成多种不同类型的字符集的工具。
获取基本类型
ByteBuffer bb = ByteBuffer.allocate(1024);
bb.asCharBuffer().put("Howdy!");
char c;
while ((c = bb.getChar()) != 0)
    printnb(c + " ");
print();
bb.asShortBuffer().put((short) 471142); // 需要类型转换
print(bb.getShort());
bb.asIntBuffer().put(99471142);
print(bb.getInt());
bb.asLongBuffer().put(99471142);
print(bb.getLong());
bb.asFloatBuffer().put(99471142);
print(bb.getFloat());
bb.asDoubleBuffer().put(99471142);
print(bb.getDouble());
/* Output:
H o w d y !
12390
99471142
99471142
9.9471144E7
9.9471142E7
*///:~
视图缓冲器
视图缓冲器(view buffer)可以让我们通过某个特定的基本数据类型的视窗查看其底层的 ByteBuffer。ByteBuffer 依然是实际存储数据的地方,“支持”着前面的视图,因此,对视图的任何修改都会映射成为对 ByteBuffer 中数据的修改。视图还允许从 ByteBuffer 一次一个地(与 ByteBuffer 所支持的方式相同)或者成批地(放入数组中)读取基本类型值。
ByteBuffer bb = ByteBuffer.allocate(BSIZE);
IntBuffer ib = bb.asIntBuffer();
ib.put(new int[] { 11, 42, 47, 99, 143, 811, 1016 });
System.out.println(ib.get(3));
ib.put(3, 1811);
ib.flip();
while (ib.hasRemaining()) {
    int i = ib.get();
    System.out.print(i + " ");
}
/* Output:
99
11 42 47 1811 143 811 1016
 */// :~
字节存放次序
不同的机器可能会使用不同的字节排序方法来存储数据。“big endian”(高位字节优先)将高位字节存放在地址最低的存储器单元。“litter endian”(低位字节优先)则是将高位字节放在地址最高的存储器单元。当存储量大于一个字节时,像 int、float等,就要考虑字节的顺序问题了。ByteBuffer 是以高字节优先的形式存储数据的,并且数据在网上传送时也常常使用高位优先的形式。可以使用带有参数的 ByteOrder.BIG_ENDIAN 或 ByteOrder.LITTLE_ENDIAN 的 order() 方法改变 ByteBuffer 的字节排序方式。
如果以 short(ByteBuffer.asShortBuffer) 形式读取数据,得到的数字是 97(二进制的形式为 00000000 01100001);但是如果将 ByteBuffer 更改成低位优先形式,得到的数字却是 24832(01100001 00000000)
public class Endians {
    public static void main(String[] args) {
        ByteBuffer bb = ByteBuffer.wrap(new byte[12]);
        bb.asCharBuffer().put("abcdef");
        print(Arrays.toString(bb.array()));
        bb.rewind();
        bb.order(ByteOrder.BIG_ENDIAN);
        bb.asCharBuffer().put("abcdef");
        print(Arrays.toString(bb.array()));
        bb.rewind();
        bb.order(ByteOrder.LITTLE_ENDIAN);
        bb.asCharBuffer().put("abcdef");
        print(Arrays.toString(bb.array()));
    }
} /* Output:
[0, 97, 0, 98, 0, 99, 0, 100, 0, 101, 0, 102]
[0, 97, 0, 98, 0, 99, 0, 100, 0, 101, 0, 102]
[97, 0, 98, 0, 99, 0, 100, 0, 101, 0, 102, 0]
*///:~
ByteBuffer 有足够的空间,以存储作为外部缓冲器的 charArray 中的所有字节,因此可以调用 array() 方法显示视图底层的字节。array() 方法是“可选的”,并且只能对由数组支持的缓冲器调用此方法;否则,将会抛出 UnsupportedOperationException。
用缓冲器操纵数据
如果想把一个字节数组写到文件中去,那么就应该使用 ByteBuffer.wrap() 方法把字节数组包装起来,然后用 getChannel() 方法在 FileOutputstream 上打开一个通道,接着讲来自于 ByteBuffer 的数据写到 FileChannel中。
注意,ByteBuffer 是将数据移进移出通道的唯一方式,并且只能创建一个独立的基本类型缓冲器,或者使用 “as” 方法从 ByteBuffer 中获得。也就是说,不能把基本类型的缓冲器转换成 ByteBuffer。然而,由于可以经由视图缓冲器将基本类型数据移进移出 ByteBuffer,所以这也不是什么真正的限制了。
缓冲器的细节
Buffer 由数据和可以高效地访问及操纵这些数据的四个索引(mark(标记)、position(位置)、limit(界限)、capacity(容量))组成。
| 方法 | 说明 |
|---|---|
| capacity() | 返回缓冲区容量 |
| clear() | 清空缓冲区,将 position 设置为 0,limit 设置为容量。我们可以调用此方法覆写缓冲区。 |
| flip() | 将 position 和 limit 设置为 0,此方法用于准备从缓冲区读取已经写入的数据。 |
| limit() | 返回 limit 值 |
| limit(int lim) | 设置 limit 值 |
| mark() | 将 mark 设置为 position |
| reset() | 将 position 设置为 mark |
| rewind() | 将 position 设置为 0,mark 设置为 -1 |
| position() | 返回 position 值 |
| position(int pos) | 设置 position 值 |
| remaining() | 返回 (limit - position) |
| hasRemaining() | 若有介于 position 和 limit 之间的元素,则返回 true |
内存映射文件
内存映射文件允许我们创建和修改那些因为太大而不能放入内存的文件。有了内存映射文件,我们就可以假定整个文件都放在内存中,而且可以完全把它当作非常大的数组来访问。这种方法极大地简化了用于修改文件的代码。
public class LargeMappedFiles {
    static int length = 0x8FFFFFF; // 128 MB,实际文件查看 143MB
    public static void main(String[] args) throws Exception {
        MappedByteBuffer out = new RandomAccessFile("test.dat", "rw")
                .getChannel().map(FileChannel.MapMode.READ_WRITE, 0, length);
        for (int i = 0; i < length; i++) {
            out.put((byte) 'x');
        }
        print("Finished writing");
        for (int i = length / 2; i < length / 2 + 6; i++) {
            System.out.print((char) out.get(i));
        }
    }
}
// Finished writing
// xxxxxx
为了既能写又能读,先由 RandomAccessFile 开始,获得该文件上的通道,然后调用 map() 产生 MappedByteBuffer,这是一种特殊类型的直接缓冲器。注意必须指定映射文件的初始位置和映射区域的长度,这意味着可以映射某个大文件的较小的部分。
MappedByteBuffer 由 ByteBuffer 继承而来,因此它具有 ByteBuffer 的所有方法。
只有一部份文件放入了内存,文件的其他部分被交换了出去,用这种方式,很大的文件(可达 2GB)也可以很容易地修改。注意底层操作系统的文件映射工具是用来最大化地提高性能。
文件加锁
文件加锁机制,它允许我们同步访问某个作为共享资源的文件。文件锁对其他的操作系统进程是可见的,因为 Java 的文件锁直接映射到了本地操作系统的加锁工具。
public class FileLocking {
    public static void main(String[] args) throws Exception {
        FileOutputStream fos = new FileOutputStream("file.txt");
        FileLock fl = fos.getChannel().tryLock();
        if (fl != null) {
            System.out.println("Locked File");
            TimeUnit.MILLISECONDS.sleep(100);
            fl.release();
            System.out.println("Released Lock");
        }
        fos.close();
    }
} /* Output:
Locked File
Released Lock
*///:~
通过对 FileChannel 调用 tryLock() 或 lock(),就可以获得整个文件的 FileLock。(SocketChannel、DatagramChannel 和 ServerSocketChannel 不需要加锁,因为它们是从单进程实体继承而来,我们通常不再两个进程之间共享网络 socket)。
tryLock() 是非阻塞式的,它设法获得锁,但是如果不能获得(当其他一些进程已经持有相同的锁,并且不共享时),它将直接从方法调用返回。
lock() 则是阻塞式的,它要阻塞进程直至锁可以获得,或调用 lock() 的线程中断,或调用 lock() 的通道关闭。使用 FileLock.release() 可以释放锁。
也可以对文件的一部分上锁:
tryLock(long position, long size, boolean shared)
lock(long position, long size, boolean shared)
加锁的区域由 size-position 决定。第三个参数指定是否是共享锁。
如果操作系统不支持共享锁并为每一个请求都创建一个锁,那么它就会使用独占锁。锁的类型可以通过 FileLock.isShared() 进行查询。
对映射文件的部分加锁
文件映射通常用于极大的文件。我们需要对这种巨大的文件进行部分加锁,以便其他进程可以修改文件中未被加锁的部分。
下面例子中有两个线程,分别加锁文件的不同部分。
public class LockingMappedFiles {
    static final int LENGTH = 0x8FFFFFF; // 128 MB
    static FileChannel fc;

    public static void main(String[] args) throws Exception {
        fc = new RandomAccessFile("test.dat", "rw").getChannel();
        MappedByteBuffer out = fc.map(FileChannel.MapMode.READ_WRITE, 0, LENGTH);
        for (int i = 0; i < LENGTH; i++) {
            out.put((byte) 'x');
        }
        new LockAndModify(out, 0, 0 + LENGTH / 3);
        new LockAndModify(out, LENGTH / 2, LENGTH / 2 + LENGTH / 4);
    }

    private static class LockAndModify extends Thread {
        private ByteBuffer buff;
        private int start, end;

        LockAndModify(ByteBuffer mbb, int start, int end) {
            this.start = start;
            this.end = end;
            mbb.limit(end);
            mbb.position(start);
            buff = mbb.slice(); // 创建新的字节缓冲区,其内容是此缓冲区内容的共享子序列。
            start();
        }

        public void run() {
            try {
                // Exclusive lock with no overlap:
                FileLock fl = fc.lock(start, end, false);
                System.out.println("Locked: " + start + " to " + end);
                // Perform modification:
                while (buff.position() < buff.limit() - 1) {
                    buff.put((byte) (buff.get() + 1));
                }
                fl.release(); // Java 虚拟机会自动释放锁
                System.out.println("Released: " + start + " to " + end);
            } catch (IOException e) {
                throw new RuntimeException(e);
            }
        }
    }
} /*
Locked: 0 to 50331647
Locked: 75497471 to 113246206
Released: 75497471 to 113246206
Released: 0 to 50331647
/:~
Java 档案文件
“选项”用一系列字母表示(不必输入 "-" 或其他任何指示符)和 tar 命令类似。如下所示:
- c,创建新的或空的压缩档
- t,列出目录表
- x,解压所有文件
- x,file 解压指定文件
- f,指出“我准备向你提供文件名”。若省略此参数,jar 会假定它的输入来自标准输入;或者在它创建文件时,输出会进入标准输出内
- m,指出第一个参数将是用户自建的详情表文件的名字
- v,产生详细输出,对 jar 做的工作进行巨细无遗的描述
- O,只保存文件;不压缩文件(用于创建一个 JAR 文件,以便我们将其置入自己的类路径中)
- M,不自动生成详情表文件
对象序列化
对象实现了 Serializable 接口,序列化对象就会很简单。首先要创建某些 OutputStream 对象,然后将其封装到 ObjectOutputStream 对象内。此时,只需调用 writeObject() 即可完成对象的序列化,并将其发送给 OutputStream。相反的过程是将一个InputStream 封装到 ObjectInputStream 内,然后调用 readObject()。和往常一样,我们最后获得的是指向一个上溯造型 Object 的句柄,所以必须下溯造型,以便能够直接设置。
每个类都持有一个特定的 serialVersionUID,如果待序列化的对象和目标对象的 serialVersionUID 不同,那么在反序列化时就会抛出 InvalidClassException 异常。
序列化有个“缺陷”,就是不能序列化静态字段。需要自己添加额外方法来实现追加序列化静态字段。
序列化的控制 Externalizable 接口
通过实现 Externalizable 接口,用它代替 Serializable 接口,便可控制序列化的具体过程。这个 Externalizable 接口扩展了 Serializable,并增添了两个方法:writeExternal() 和 readExternal()。在序列化和重新装配的过程中,会自动调用这两个方法,以便我们执行一些特殊操作。
与恢复一个 Serializable(可序列化)对象不同。在后者的情况下,对象完全以它保存下来的二进制位为基础恢复,不存在构建器调用。而对一个 Externalizable 对象,所有默认构造器都会被调用(包括在字段定义时的初始化),而且会调用 readExternal()。必须注意这一事实————特别注意所有默认构造器都会被调用,才能使 Externalizable 对象中产生正确的行为。所以默认构造器得是public的,否则会抛出异常。
public class Blip3 implements Externalizable {
    private int i;
    private String s; // No initialization

    public Blip3() {
        print("Blip3 Constructor");
        // s, i not initialized
    }

    public Blip3(String x, int a) {
        print("Blip3(String x, int a)");
        s = x;
        i = a;
        // s & i initialized only in non-default constructor.
    }

    public String toString() {
        return s + i;
    }

    public void writeExternal(ObjectOutput out) throws IOException {
        print("Blip3.writeExternal");
        // You must do this:
        out.writeObject(s);
        out.writeInt(i);
    }

    public void readExternal(ObjectInput in) throws IOException, ClassNotFoundException {
        print("Blip3.readExternal");
        // You must do this:
        s = (String) in.readObject();
        i = in.readInt();
    }

    public static void main(String[] args) throws IOException, ClassNotFoundException {
        print("Constructing objects:");
        Blip3 b3 = new Blip3("A String ", 47);
        print(b3);
        ObjectOutputStream o = new ObjectOutputStream(new FileOutputStream("Blip3.out"));
        print("Saving object:");
        o.writeObject(b3);
        o.close();
        // Now get it back:
        ObjectInputStream in = new ObjectInputStream(new FileInputStream("Blip3.out"));
        print("Recovering b3:");
        b3 = (Blip3) in.readObject();
        print(b3);
    }
} /* Output:
Constructing objects:
Blip3(String x, int a)
A String 47
Saving object:
Blip3.writeExternal
Recovering b3:
Blip3 Constructor
Blip3.readExternal
A String 47
*///:~
为了让一切正常运作起来,不仅需在 writeExternal() 方法(没有默认的行为可用来为一个 Externalizable 对象写入所有成员对象)中将重要信息写入,还必须在 readExternal() 方法中也恢复那些数据。
transient(瞬时)关键字
在对象中具有 “private” 属性,但一旦经序列化处理,人们就可以通过读取一个文件,或者拦截网络传输得到它。为解决这个问题,可以用 transient(临时)逐个字段地关闭序列化。
由于 Externalizable 对象在默认情况下不保存它们的任何字段,所以 transient 只能和 Serializable 对象一起使用
Externalizable 的替代方法
我们可以实现 Serializable 接口,并添加(注意是“添加”,而非“覆盖”或者“实现”)名为 writeObject() 和 readObject()的方法。一旦对象被序列化或者被反序列化还原,就会分别调用那两个方法。也就是说,只要提供了这两个方法,就会优先使用它们,而不考虑默认的序列化机制。
这些方法必须含有下列准确的签名:
private void writeObject(ObjectOutputStream stream) throws IOException;
private void readObject(ObjectInputStream stream) throws IOException, ClassNotFoundException
被定义成 “private”,这意味着它们只能由这个类的其他成员调用。然而,我们实际并不从这个类的其他成员中调用它们,而是由 ObjectOutputStream 和 ObjectInputStream 的 writeObject() 及 readObject() 方法来调用我们对象的 writeObject() 和 readObject() 方法。
在我们的 writeObject() 内部,可以调用 defaultWriteObject(),从而决定执行默认的 writeObject()。调用 defaultReadObject(),令其作为 readObject() 的第一个操作。
使用持久性
通过一个字节数组应用对象的序列化,从而实现对任何 Serializable(可序列化)对象的一个“深度复制”(深度复制意味着复制的是整个对象网,而不仅是基本对象及其引用,且需要都实现 Serializable)。
只要将所有东西都序列化到单独一个数据流里,就能恢复获得与以前写入时完全一样的对象网,不会不慎造成对象的重复(实际两个引用都是指向同一个对象,但是如果分开写入不同的流,恢复时,会重复恢复出不同的对象)。
如果想保存系统状态,最安全的做法是当作一种“原子”操作序列化。应将构成系统状态的所有对象都置入单个容器内,并在一次操作里完成那个容器的写入。这样一来,同样只需一次方法调用,即可成功恢复之。
Preferences
只能存储基本类型和字符串(小于 8K)。
Preferences prefs = Preferences.userNodeForPackage(PreferencesDemo.class);
prefs.clear(); // 清空
prefs.put("Location", "Oz");
prefs.putInt("Companions", 4);
prefs.putBoolean("Are there witches?", true);
int usageCount = prefs.getInt("UsageCount", 0); // 必需提供默认值
usageCount++;
prefs.putInt("UsageCount", usageCount); // 每次运行 +1,存储在了系统资源中
for (String key : prefs.keys()){
    System.out.println(key + ": " + prefs.get(key, null));
}
System.out.println(prefs.getInt("Companions", 0));
/* Output: (Sample)
Location: Oz
Companions: 4
Are there witches?: true
UsageCount: 53
How many companions does Dorothy have? 4
*///:~
userNodeForPackage() 用于个别用户偏好,systemNodeForPackage() 用于通用的安装配置。在非静态方法内部,通常用 getClass() 标识节点,静态方法中可以用 .class。
转载请注明来源,欢迎对文章中的引用来源进行考证,欢迎指出任何有错误或不够清晰的表达。可以在下面评论区评论,也可以邮件至 bin07280@qq.com
文章标题:《Java编程思想》笔记18-Java I/O系统
文章字数:8.5k
本文作者:Bin
发布时间:2018-06-16, 20:32:01
最后更新:2019-08-06, 00:46:42
原始链接:http://coolview.github.io/2018/06/16/Java%E7%BC%96%E7%A8%8B%E6%80%9D%E6%83%B3/%E3%80%8AJava%E7%BC%96%E7%A8%8B%E6%80%9D%E6%83%B3%E3%80%8B%E7%AC%94%E8%AE%B018-Java-I-O%E7%B3%BB%E7%BB%9F/版权声明: "署名-非商用-相同方式共享 4.0" 转载请保留原文链接及作者。