《跟我学Shiro》笔记07-与Web集成
原文地址:第七章 与Web集成——《跟我学Shiro》
目录贴: 跟我学Shiro目录贴
源码:https://github.com/zhangkaitao/shiro-example
使用了 jetty-maven-plugin 和 tomcat7-maven-plugin 插件
<build>
    <finalName>chapter7</finalName>
    <plugins>
        <plugin>
            <groupId>org.mortbay.jetty</groupId>
            <artifactId>jetty-maven-plugin</artifactId>
            <version>8.1.8.v20121106</version>
            <configuration>
                <webAppConfig>
                    <contextPath>/${project.build.finalName}</contextPath>
                </webAppConfig>
            </configuration>
        </plugin>

        <plugin>
            <groupId>org.apache.tomcat.maven</groupId>
            <artifactId>tomcat7-maven-plugin</artifactId>
            <version>2.2</version>
            <configuration>
                <path>/${project.build.finalName}</path>
            </configuration>
        </plugin>
    </plugins>
</build>
这样可以直接使用 mvn jetty:run 或 mvn tomcat7:run 直接运行 webapp 了。然后通过 URL http://localhost:8080/chapter7/ 访问即可。
添加依赖
<dependency>
    <groupId>javax.servlet</groupId>
    <artifactId>javax.servlet-api</artifactId>
    <version>3.0.1</version>
    <scope>provided</scope>
</dependency>
<dependency>
    <groupId>org.apache.shiro</groupId>
    <artifactId>shiro-web</artifactId>
    <version>1.2.2</version>
</dependency>
Servlet3 的知识可以参考 https://github.com/zhangkaitao/servlet3-showcase 及 Servlet3 规范 http://www.iteye.com/blogs/subjects/Servlet-3-1。
ShiroFilter 入口
Shiro 1.2 开始引入了 Environment/WebEnvironment 的概念,即由它们的实现提供相应的 SecurityManager 及其相应的依赖。ShiroFilter 会自动找到 Environment 然后获取相应的依赖。
<listener>
    <listener-class>org.apache.shiro.web.env.EnvironmentLoaderListener</listener-class>
</listener>
<!-- 通过 EnvironmentLoaderListener 来创建相应的 WebEnvironment,并自动绑定到 ServletContext,默认使用 IniWebEnvironment 实现。 -->

<context-param>
    <param-name>shiroEnvironmentClass</param-name>
    <param-value>org.apache.shiro.web.env.IniWebEnvironment</param-value>
</context-param>
<context-param>
    <param-name>shiroConfigLocations</param-name>
    <param-value>classpath:shiro.ini</param-value>
    <!-- 默认先从 /WEB-INF/shiro.ini,如果没有找 classpath:shiro.ini -->
</context-param>
<filter>
    <filter-name>shiroFilter</filter-name>
    <filter-class>org.apache.shiro.web.servlet.ShiroFilter</filter-class>
</filter>
<filter-mapping>
    <filter-name>shiroFilter</filter-name>
    <url-pattern>/*</url-pattern>
</filter-mapping>
INI 配置
[main]
;默认是 /login.jsp
authc.loginUrl=/login
roles.unauthorizedUrl=/unauthorized
perms.unauthorizedUrl=/unauthorized

logout.redirectUrl=/login

[users]
zhang=123,admin
wang=123

[roles]
admin=user:*,menu:*

[urls]
/logout2=logout
/login=anon
/logout=anon
/unauthorized=anon
/static/**=anon
/authenticated=authc
/role=authc,roles[admin]
/permission=authc,perms["user:create"]
其中最重要的就是 [urls] 部分的配置,其格式是:url=拦截器[参数],拦截器[参数];即如果当前请求的 url 匹配 [urls] 部分的某个 url 模式,将会执行其配置的拦截器。比如 anon 拦截器表示匿名访问(即不需要登录即可访问);authc 拦截器表示需要身份认证通过后才能访问;roles[admin] 拦截器表示需要有 admin 角色授权才能访问;而 perms["user:create"] 拦截器表示需要有 user:create 权限才能访问。
url 模式使用 Ant 风格模式
Ant 路径通配符支持 ?、*、**,注意通配符匹配不包括目录分隔符 / :
?:匹配一个字符,如/admin?将匹配/admin1,但不匹配/admin或/admin12;*:匹配零个或多个字符串,如/admin*将匹配/admin、/admin123,但不匹配/admin/1;**:匹配路径中的零个或多个路径,如/admin/**将匹配/admin/a或/admin/a/b。
url 模式匹配顺序
url 模式匹配顺序是按照在配置中的声明顺序匹配,即从头开始使用第一个匹配的 url 模式对应的拦截器链。如:
/bb/**=filter1
/bb/aa=filter2
/**=filter3
如果请求的 url 是 /bb/aa,因为按照声明顺序进行匹配,那么将使用 filter1 进行拦截。
身份验证(登录)
首先配置需要身份验证的 url
/authenticated=authc
/role=authc,roles[admin]
/permission=authc,perms["user:create"]即访问这些地址时会首先判断用户有没有登录,如果没有登录默会跳转到登录页面,默认是 /login.jsp,可以通过在 [main] 部分通过如下配置修改:
authc.loginUrl=/login登录 Servlet
@WebServlet(name = "loginServlet", urlPatterns = "/login")
public class LoginServlet extends HttpServlet {

    // doGet 请求时展示登录页面
    @Override
    protected void doGet(HttpServletRequest req, HttpServletResponse resp) throws ServletException, IOException {
        req.getRequestDispatcher("/WEB-INF/jsp/login.jsp").forward(req, resp);
    }

    // doPost 时进行登录,登录时收集 username/password 参数,然后提交给 Subject 进行登录。如果有错误再返回到登录页面;
    // 否则跳转到登录成功页面(此处应该返回到访问登录页面之前的那个页面,或者没有上一个页面时访问主页)
    @Override
    protected void doPost(HttpServletRequest req, HttpServletResponse resp) throws ServletException, IOException {
        String error = null;
        String username = req.getParameter("username");
        String password = req.getParameter("password");
        Subject subject = SecurityUtils.getSubject();
        UsernamePasswordToken token = new UsernamePasswordToken(username, password);
        token.setRememberMe(true);
        try {
            subject.login(token);
        } catch (UnknownAccountException e) {
            error = "用户名/密码错误";
        } catch (IncorrectCredentialsException e) {
            error = "用户名/密码错误";
        } catch (AuthenticationException e) {
            // 其他错误,比如锁定,如果想单独处理请单独 catch 处理
            error = "其他错误:" + e.getMessage();
        }

        if(error != null) { // 出错了,返回登录页面
            req.setAttribute("error", error);
            req.getRequestDispatcher("/WEB-INF/jsp/login.jsp").forward(req, resp);
        } else { // 登录成功
            req.getRequestDispatcher("/WEB-INF/jsp/loginSuccess.jsp").forward(req, resp);
        }
    }
}
基于 Basic 的拦截器身份验证
web.xml,把 shiroConfigLocations 改为 shiro-basicfilterlogin.ini 即可
[main]
authcBasic.applicationName=please login
; ………省略 users
[urls]
/role=authcBasic,roles[admin]
authcBasic 是 org.apache.shiro.web.filter.authc.BasicHttpAuthenticationFilter 类型的实例,其用于实现基于 Basic 的身份验证;applicationName 用于弹出的登录框显示信息使用,如图:
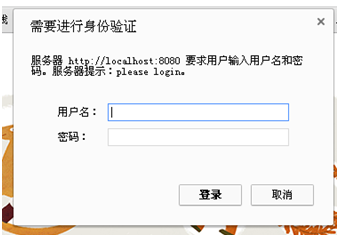
[urls] 部分配置了 /role 地址需要走 authcBasic 拦截器,即如果访问 /role 时还没有通过身份验证那么将弹出如上图的对话框进行登录,登录成功即可访问。
基于表单的拦截器身份验证
web.xml,把 shiroConfigLocations 改为 shiro-formfilterlogin.ini 即可。
[main]
authc.loginUrl=/formfilterlogin
authc.usernameParam=username
authc.passwordParam=password
authc.successUrl=/
authc.failureKeyAttribute=shiroLoginFailure

[urls]
/role=authc,roles[admin]
authc 是 org.apache.shiro.web.filter.authc.FormAuthenticationFilter 类型的实例,其用于实现基于表单的身份验证;
loginUrl指定当身份验证时的登录表单;usernameParam指定登录表单提交的用户名参数名;passwordParam指定登录表单提交的密码参数名;successUrl指定登录成功后重定向的默认地址(默认是/)(如果有上一个地址会自动重定向带该地址);failureKeyAttribute指定登录失败时的 request 属性 key(默认shiroLoginFailure);这样可以在登录表单得到该错误 key 显示相应的错误消息;
@WebServlet(name = "formFilterLoginServlet", urlPatterns = "/formfilterlogin")
public class FormFilterLoginServlet extends HttpServlet {

    @Override
    protected void doGet(HttpServletRequest req, HttpServletResponse resp) throws ServletException, IOException {
        doPost(req, resp);
    }

    @Override
    protected void doPost(HttpServletRequest req, HttpServletResponse resp) throws ServletException, IOException {
        String errorClassName = (String)req.getAttribute("shiroLoginFailure");

        if(UnknownAccountException.class.getName().equals(errorClassName)) {
            req.setAttribute("error", "用户名/密码错误");
        } else if(IncorrectCredentialsException.class.getName().equals(errorClassName)) {
            req.setAttribute("error", "用户名/密码错误");
        } else if(errorClassName != null) {
            req.setAttribute("error", "未知错误:" + errorClassName);
        }

        req.getRequestDispatcher("/WEB-INF/jsp/formfilterlogin.jsp").forward(req, resp);
    }
}
输入 http://localhost:8080/chapter7/role ,会跳转到 /formfilterlogin 登录表单,提交表单如果 authc 拦截器登录成功后,会直接重定向会之前的地址 /role;假设我们直接访问 /formfilterlogin 的话登录成功将直接到默认的 successUrl。
授权(角色/权限验证)
[main]
roles.unauthorizedUrl=/unauthorized
perms.unauthorizedUrl=/unauthorized
 [urls]
/role=authc,roles[admin]
/permission=authc,perms["user:create"]
通过 unauthorizedUrl 属性指定如果授权失败时重定向到的地址。
roles 是 org.apache.shiro.web.filter.authz.RolesAuthorizationFilter 类型的实例,通过参数指定访问时需要的角色,如 [admin],如果有多个使用 , 分割,且验证时是 hasAllRole 验证,即且的关系。
Perms 是 org.apache.shiro.web.filter.authz.PermissionsAuthorizationFilter 类型的实例,和 roles 类似,只是验证权限字符串。
RoleServlet
@WebServlet(name = "roleServlet", urlPatterns = "/role")
public class RoleServlet extends HttpServlet {

    @Override
    protected void doGet(HttpServletRequest req, HttpServletResponse resp) throws ServletException, IOException {
        Subject subject = SecurityUtils.getSubject();
        subject.checkRole("admin");
        req.setAttribute("subject",subject);
        req.getRequestDispatcher("/WEB-INF/jsp/hasRole.jsp").forward(req, resp);
    }
}
PermissionServlet
@WebServlet(name = "permissionServlet", urlPatterns = "/permission")
public class PermissionServlet extends HttpServlet {

    @Override
    protected void doGet(HttpServletRequest req, HttpServletResponse resp) throws ServletException, IOException {
        Subject subject = SecurityUtils.getSubject();
        subject.checkPermission("user:create");
        req.getRequestDispatcher("/WEB-INF/jsp/hasPermission.jsp").forward(req, resp);
    }
}
测试
首先访问 http://localhost:8080/chapter7/login ,使用帐号 zhang/123 进行登录,再访问 /role 或 /permission 时会跳转到成功页面(因为其授权成功了);如果使用帐号 wang/123 登录成功后访问这两个地址会跳转到 /unauthorized 即没有授权页面。
退出
/logout=anon指定 /logout 使用 anon 拦截器即可,即不需要登录即可访问。
LogoutServlet
@WebServlet(name = "logoutServlet", urlPatterns = "/logout")
public class LogoutServlet extends HttpServlet {

    @Override
    protected void doGet(HttpServletRequest req, HttpServletResponse resp) throws ServletException, IOException {
        SecurityUtils.getSubject().logout();
        req.getRequestDispatcher("/WEB-INF/jsp/logoutSuccess.jsp").forward(req, resp);
    }
}
Shiro 也提供了 logout 拦截器用于退出,其是 org.apache.shiro.web.filter.authc.LogoutFilter 类型的实例,我们可以在 shiro.ini 配置文件中通过如下配置完成退出:
[main]
logout.redirectUrl=/login

[urls]
/logout2=logout
通过 logout.redirectUrl 指定退出后重定向的地址;通过 /logout2=logout 指定退出 url 是 /logout2。这样当我们登录成功后然后访问 /logout2 即可退出。
转载请注明来源,欢迎对文章中的引用来源进行考证,欢迎指出任何有错误或不够清晰的表达。可以在下面评论区评论,也可以邮件至 bin07280@qq.com
文章标题:《跟我学Shiro》笔记07-与Web集成
文章字数:2.3k
本文作者:Bin
发布时间:2018-04-14, 20:12:22
最后更新:2019-09-02, 14:18:39
原始链接:http://coolview.github.io/2018/04/14/%E8%B7%9F%E6%88%91%E5%AD%A6Shiro/%E3%80%8A%E8%B7%9F%E6%88%91%E5%AD%A6Shiro%E3%80%8B%E7%AC%94%E8%AE%B007-%E4%B8%8EWeb%E9%9B%86%E6%88%90/版权声明: "署名-非商用-相同方式共享 4.0" 转载请保留原文链接及作者。